What can you put in a paper cake. How to make a paper cake with your own hands: master classes
What a great idea to wrap gifts in a cake! It is not at all difficult to calculate the number of guests and everyone will get a sweet gift, a surprise, a wish, or even a comic horoscope (prediction) as a keepsake! Make this cake for an anniversary or birthday, kindergarten or school!

How to make paper cake
For a paper cake, templates are usually used, which are transferred to thick colored or decorative paper. For wedges, 3 types of template are used - template No. 1 and template No. 2 with a lock and template No. 3 with a cap. In template No. 3, you can make various variations of the cap - straight, with a frill or cloves.


Step 1
Print the template or transfer it to thick paper.
Step 2
Cut out the template. Make folds along the dotted lines.

Step 3
Glue the cut and folded template.

Step 4
Decorate to your liking.

Step 5
Fill each wedge with a small treat, surprise, wish, or congratulation.
Step 6
Fold the cake - usually 12 wedges are made for one cake (first tier). You can fasten them with tape. Don't forget to make a cardboard cake stand.
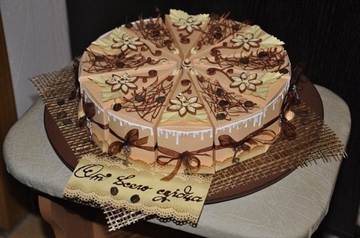
Paper Cake Examples
The cake can be made one-two-tiered and even multi-tiered!


A paper one can be plain or multi-colored, you can decorate it as you like - with various figures, paper flowers, ribbons or serpentine. A cake decorated with quilling flowers looks very impressive.

 t
t


A chic piece of cake is a great way to present a small gift to a dear or close person, or to make a pleasant surprise for a friend.
Sometimes you really want to surprise friends or relatives and please them on a significant day with something unusual. Moreover, gifts made from the heart and with your own hands are always appreciated and accepted with gratitude and delight. One such interesting surprise is the cake. What is unusual here, you ask. And the fact that a homemade cake will be completely inedible, but with a lot of good congratulations and pleasant things. A cardboard cake with wishes with your own hands is a great gift for any occasion, both for adults and children.
Each piece of cake contains an original congratulation and a small surprise that will definitely cheer up its owner, because human psychology is arranged in such a way that opening gifts and receiving surprises is a guaranteed surge of happiness hormones. Yes, and such a cake will surely appeal to those who do not eat sweets or follow the figure.
This handmade cake is perfect for themed parties or children's parties. It is enough to count the number of guests, make the required number of pieces, put a wish with a surprise in each and hold a kind of lottery or fortune-telling - what wish will come true for the one who pulled out this or that piece. Without a doubt, there will be no limit to the joy of such an event!
In this article, we will learn how to make a cardboard cake with our own hands, what tools and materials will come in handy, and what wishes and gifts can be left as a surprise.
Cardboard sweets
So, for work you will need: thin cardboard, scissors, glue, a ruler and a pencil, for decoration - colored paper, ribbons, beads and everything that fantasy tells.
Mk for making a cake begins with the creation of a drawing of each piece.
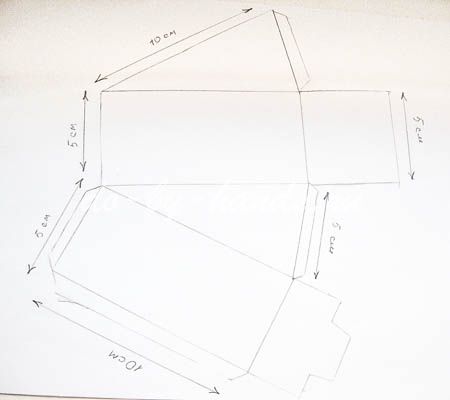
You can use a ready-made cardboard cake template with dimensions, for example, this one:
Or print this template on paper:

We transfer the stencil to cardboard or draw the part on our own, and then cut it out along the contour.

For convenience, you can immediately use colored cardboard - you will need 13 sheets of different colors. Now in stationery stores you can find material not only in a variety of bright colors, but also textured, iridescent, holographic and other types of cardboard. So the cake will look very impressive.
Bend the blank along the dotted lines to the inside of the cardboard.

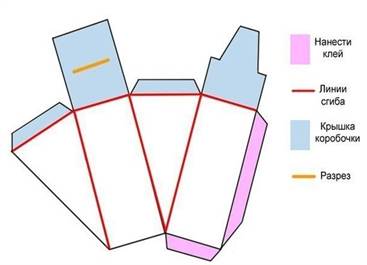
We glue the edges and make a small cutout according to the following scheme.
We leave open the wide side of the piece in order to fill it with wishes and surprises.

And now the most interesting thing - we fill the contents of the cake. In each piece we put a note with a wish. You can limit yourself to congratulations, but the greatest delight will be caused by small surprise gifts that correspond to every wish.


We close the pieces of the cake, using the slot in the part as a lock. And then decorate the cake with ribbons or beads.


Jewelry options can be very different. Below are some photos with ideas for decorating a cake:


Polymer clay or plasticine is also good for creating the effect of real cream or cream on a cake, or for placing and fixing small candles. But you must be careful when using real candles and follow fire safety rules.
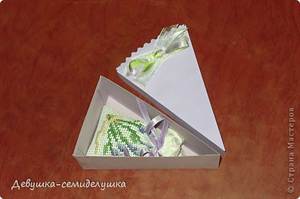
By the way, cake pieces can be made in the form of triangular boxes with a lid, for example, these:

Options for wishes can be very diverse, ranging from standard to the most personal and special. Here is an example of some congratulations and good parting words:
- "Sweet life" and put a chocolate bar or sweets.
- "Vivid impressions" - colored pencils, crayons or multi-colored sweets are suitable.
- "Great luck" - symbolizes dice or a lottery ticket.
- "Innumerable wealth" - of course, money or coins.
- "Have a good rest" - a shell or a magnet.
- "Good health" - vitamins, ascorbic acid or hematogen are suitable.
- "Unlimited Love" - a small heart.
- "Home warmth" - you can put a candle.
- "Additions to the family" - a small doll or nipple.
- "Cheerfulness" - coffee beans in a beautiful package are perfect.
And many more different surprises and gifts can be thought up for any holiday.
Video on the topic of the article
More interesting ideas for making and decorating a cardboard cake with wishes can be seen in the following videos.
Nowadays, no one is surprised by the usual gift wrapping with bright paper and a cute bow. The best solution for congratulating a loved one will be a cake made of paper and accessories! It consists of several pieces in which you can conveniently hide whatever you want: sweets, gifts, money. Surprise your friends with an original and pleasant congratulation!
- A paper cake is a special type of packaging for celebrations and holidays that you can present to a loved one.
- It gives you the opportunity to give not one, but several (up to twelve) gifts at once, hidden in each piece of cake
- Few people know that giving this gift is not the most pleasant, the most pleasant thing is to make it with your own hands.
- In order to make a cake with your own hands, you will need a set of completely simple tools: cardboard (it is best to use cardboard, not paper), scissors, glue and decorative elements
- Absolutely everything acts as decorative elements: colored paper, ribbons, lace, beads, beads, coffee beans, rhinestones, bows, flowers
- All decorative elements can be easily found in any modern hardware department.
A paper cake can be created to contain individual wishes, or it can act as a wrapping for your personal gifts. Its design will delight anyone and give a lot of pleasant emotions.
Paper cake is perfect for any event:
- for birthday- the best option, because the cake is traditionally considered a symbol of this particular holiday (be sure that with such a gift your present will be the best of a thousand!)
- for a wedding - a great option to give young people a sum of money in each piece, where you indicate what it is desirable to spend it on
- for the anniversary - such packaging will become not only original, but also a beautiful way to present all warm wishes to the hero of the day
- for the New Year and Christmas holidays - Probably the best way to give a few small items of varying significance. The cake will give a festive impression and leave pleasant memories.
- for Valentine's Day - the cake will be an original way to confess your love and put your loving wish and a symbolic gift into each piece
- on March 8 - and give your beloved woman a few small pleasant surprises, because all women appreciate gifts, originality and beautiful things
- on Defender of the Fatherland Day - to emphasize how much your beloved man means to you and give him a few pleasant little things
- for a professional holiday to make it clear to a person that he is very appreciated at work and loved. Such a cake can serve as an excellent packaging for various inexpensive (or, conversely, expensive little things)
Video: “Do-it-yourself paper surprise cake”
How to make a cake out of paper or cardboard with wishes?
A paper cake is a fairly simple craft that an inexperienced but neat person can easily make. In order for your product to look especially beautiful and stylish, you should carefully consider the design of the cake and each piece. When creating this package, you should pay attention to the original, that is, to a real cake and imitate it.

 paper cake with wishes, simple packaging
 A few tips for making a wish paper cake:
- Try to stick to one color scheme when making the cake, or combine those colors that don't resonate. To help can be a table of compatibility of colors and shades
- Too bright and colorful cakes - most likely suitable for children, if you plan to give it to an adult at an event - you need to make your cake exquisite beauty
- Do not be afraid to spend a lot of time creating a cake, the more painstaking your work is, the more beautiful and pleasant the result will be. A beautiful cake, even after opening each piece, you will not want to throw it away and it will be stored for a long time by the one to whom you presented it
- Tie all the pieces of the cake with a satin ribbon - this is an inconspicuous, but stylish and beautiful fastener. It will literally “rally” all triangular pieces into a circle and will give them one necessary shape.
- Decorate each piece of cake both outside and inside. This will make the cake look realistic, as if each piece is carefully cut with a knife.

 cake with wishes, do-it-yourself paper craft for any occasion
 If you use a real plastic box to pack this cake, then it is quite possible to achieve a “surprise effect”, because such a cake can really be mistaken for a real one.
Video: "How to make a paper cake with your own hands?"
Schemes and a template for a wish cake, how to make a cake?
In order to create such a cake with your own hands, you can’t do without a template. There are two main options for displaying it:
- personally- this means that each piece, focusing on measurements, personally measure and draw on each sheet of paper, align the curved edges, apply them to each other so that they are the same
- print on printer- the best option for creating all templates. So you can be absolutely sure that each piece will match the other 100 percent and you will significantly save your time for measuring, drawing and drawing
If, nevertheless, you do not have the slightest opportunity to download the image and print it on a printer, use these template options to draw it on each individual sheet and cut it out:

 template diagram for creating a paper cake
 If you use a printer, you can print the dream template on colored stationery with confidence. This is a special type of printer paper that can be purchased individually or in bundles at the store. Such paper can sometimes come with a ready-made pattern or simply in a wide range of colors.
Based on the color, you can easily adjust the look of your cake: chocolate (brown), vanilla (yellow), strawberry (pink) and so on. The size of the template can be adjusted by placing the image in Word and then clicking "print".

 template-scheme for printing on a printer, creating a paper cake according to the scheme
 Printable cake template
 If your paper has a pattern or color, you won't have to worry about coloring and patterning the cake. After you have cut out the template, focusing on the diagram, follow all the recommendations:
- Bend the paper at the folds, press with scissors or a fingernail to make the paper stand as desired
- Certain places are intended for gluing. In this case, it is best to use dry glue, that is, a glue stick. It will not leave wet marks and will instantly hold the paper together.
- The last square part, which literally “closes” the cake, should not be sealed - you will do this when you put your gift or wish inside. Leave this piece open
When all the work of cutting and gluing triangle pieces is finished, it's time to decorate the cake. Here you should pay attention to the examples and create your design based on them.
 children's paper cake option for any holiday
 Children's paper cake suggests the presence of various bright decorative elements:
- colorful paper flowers
- ruffles made of serpentine
- rainbow of colored paper and ribbons
- images of your favorite cartoon characters
- images of sweets: muffins, sweets, chocolates, lollipops
- paper and ribbon bows
- colorful beads

 paper cake for kids
 In the fabric and accessories store, as well as in the departments of creativity and souvenirs, you can always ask about the availability of various decorative elements that will decorate your cake and give it a special charm and significance.

 cake decorating option for any occasion: birthday, anniversary, private event
 If you are proficient in quilling techniques, you can decorate the cake with colorful patterns of flowers, fruits, vines, grapes and other elements. You can buy everything you need for quilling in any department for creativity: special paper, glue, patterns.
 two-story paper cake for congratulations
 If you decide that the number of cake pieces that you got is not enough for you, you can easily make two-story and three-story cakes:
- you can fasten such a cake with a ribbon, tying them both horizontally and vertically
- you can glue a few pieces so that the cake is “strong” and does not break on occasion
- multi-storey cakes - a great gift option for a wedding or anniversary

 Ribbon flower cake decoration
 You can effectively decorate the cake with roses made of ribbons. The technique for making tapes can be easily found on the Internet. To make them, you only need tape and glue (hot). Refinement and tenderness will be added to the cake by pearl beads, which will match the whole cake.

 paper cake decoration appliqué
 If you have enough time, you can try to make a stylish application in the style of your cake: flowers, hearts, butterflies and so on. Try to make an application from high-quality materials, combine it with fabrics and ribbons, and then the result of the work will definitely please you.

 decorating a paper cake in the spirit of "minimalism"
 You don't have to spend a lot of time decorating the cake. Make it “in the spirit of minimalism”: choose a good color scheme, focus on important elements and use very few decorative elements. Decorate the cake, for example, with a bouquet of paper roses, which is very simple to make: cut a serpentine from a round piece of paper and twist it into a bud.

 crochet paper cake decorating option
 There are several winning ways to decorate a paper cake:
- wrap white lace around each piece of the cake throughout its entire volume, it will only decorate it, but also create the feeling of white cream (or any other shade, but preferably light)
- wrap a satin ribbon over the lace, which will be much smaller than the width of the lace. It will symbolize the filling in the cake (choose contrasting colors so that they do not merge together)
- Tie a ribbon bow on each outer side of the piece, so your cake will become magnificent, elegant and festive.
- each piece of cake should be decorated with something interesting that will look like a cream: a rose, a butterfly or just a bead
Video: "Do it yourself surprise cake"
Happy birthday cake: photos of finished cakes
A paper cake is the best surprise that you can give a birthday person. So you can really surprise and please him, because it is unlikely that anyone other than you will decide on such needlework. Moreover, if you do everything carefully, then the thought that this "amateur" will not arise at all.

 handmade paper birthday cake
 Delight your child with a colorful present, in the middle of which you can put his favorite sweets:
- candies
- chewing gum
- lollipops
- biscuit
- bars
Each piece is intended for some separate sweetness, so there is no need to mix them. Opening each piece, the child will be intrigued by what he will see inside.
It is quite possible to hide small toys in such pieces:
- Kinder Surprise
- small racing cars
- small figurines and dolls
- constructor
- key chains
- small flashlight and so on
 paper cake as a birthday present for a loved one
 For the older generation, sweets are not entirely appropriate, and therefore, you need to create a kind of "assortment" of pleasant little things and important things for a person, or follow a good saying that Winnie the Pooh once said: "the best gift, of course, is honey." It's about money! So, even the smallest amount you can break into several pieces and in the end there will be a LOT of money!
Video: "Master class: a box in the form of a piece of cake"
What to put inside a paper cake? Cake with surprise and wishes
If you are at a loss and don’t know exactly how to fill your already made cake, the following options can help you:
- bright and colorful candies M&M's without packaging- as a symbol of a bright and colorful life in the future. You can also leave such a note with a wish: “Buddy! I wish you the same colorful life as these sweets. Do not be sad and eat them with pleasure!
- small model car as a symbol of the car that you wish the birthday man with the wish “I wish you to buy a new foreign car! In the meantime, you have not done this, I give you this car for transportation!
- seashell (on a keychain or decorative) - as a symbol of a vacation or a pleasant trip with the wish: “I wish you to fulfill your dream and go far, far to the sea, to the snow-white sand and relax there for your pleasure!”
- stick of strong black coffee with a hint of vivacity and strength and a wish: “I wish you a lot of strength and good spirits to accomplish all those things that you have planned and do not have time to finish!”
- stick of sugar (or candy) - a hint of a sweet life and a wish: “I wish you a sweet life, without bitterness and sourness. Let every day in pleasure and joy!
- Tick-Tock packaging a hint of "freshness" and a wish: "I wish you only fresh thoughts in your head and new ideas so that you can move on!"
- heart (keychain, toy, figurine) — with a hint of love and a wish: “I wish you to meet great love in your life and find real feelings!”
- kinder surprise (egg) a hint of surprise and a wish: “I wish that every day gives you many surprises and good news!”
- a few small colored pencils a hint of colors and a wish: “I wish you many colorful days filled with events and meetings, and if life suddenly seems gray to you, color it with these pencils!”
- dice (real, keychain or toy) - a hint of luck and a wish: “I wish you great luck and utter luck, which will glorify you and make you happy!”
- emoticon (magnet, keychain or figurine) — a hint of a good mood and a wish: “I wish you a good mood and only positive things in life, don’t get upset over trifles!”
- ascorbic acid (you can buy at the pharmacy) - a hint of health and a wish: “I wish you good health and good health! Every day, take a vitamin and don't forget about your friends!
- mirror (small pocket) a hint of beauty and a wish: “I wish you youth and unearthly beauty! Stay as beautiful and unique!”
- money (any bill) - a hint of well-being and a wish: “I wish you prosperity and financial well-being, so that there is enough for any little things and red caviar!”
- ring (jewelry for a wish or jewelry for a proposal) - a way to make a marriage proposal to your beloved girl or wish prosperity, beauty to a woman: “Be always irresistible and please yourself with pleasant little things!”
Video: "Cake with wishes made of cardboard"
Don't know what to give your boyfriend, girlfriend or sister for his birthday? Or maybe your friends are planning a wedding? If you want to give your loved ones an original and memorable gift, give them a cake. But now you will not surprise anyone with a biscuit treat with whipped cream. Make a paper gift! And inside you can put warm congratulations and memorable gifts. Believe me, such a cake with birthday wishes will be a real surprise for the birthday man.
What materials will be needed
- thick colored paper;
- PVA glue or double-sided tape;
- scissors, paints, ruler and pencil;
- decor elements: ribbons, beads, flowers made of paper or satin ribbons;
- small gifts that will be inside.
Wish cake: step by step instructions

The most important thing is inside
Inside the boxes, you can put small bundles tied with ribbons with words pleasant for the birthday man and small souvenirs. Filling must be selected individually. If you are making a surprise for your young man, the wishes should be gentle and romantic, for your girlfriend - cheerful and a little playful. And if the cake becomes a wedding gift, fill it with wishes for great love and a happy family life.
Some interesting ideas

Making a cake with wishes with your own hands is not at all difficult. You will need a few hours of free time, some simple materials and a little imagination. Such a gift will be a pleasant surprise for your loved one. And his happy smile and shining eyes will be the best reward for you.
We will tell: . And also how to make an album for a newborn, in
A cardboard cake is made to play in a store in a kindergarten, made up of separate pieces with a surprise for the kids at a children's party. This craft can be done for a school play. A birthday gift wrapped in a “piece” of cake looks spectacular.
In the article, we will look at how to make a cake out of cardboard, a template with dimensions will help you correctly draw a craft pattern on thick paper. It remains only to decorate the workpiece by drawing, appliqué or gluing other decorative elements and glue the parts together.
From the article you will learn how to make one piece of cake, how to assemble a whole cake from several identical parts. We will also consider how to glue a large multi-tiered cardboard cake. You can make a template with dimensions after a clear explanation of the work.
Pattern of a piece of cake
Let's first figure out how to make a cake out of cardboard, or rather, a piece cut off from it. You can use this craft as a surprise for a child. Prepare a large sheet of cardboard, a school triangle-ruler, a simple pencil. This is necessary in order to draw a template. Decide on the size of the cardboard cake before drawing the diagram.

The standard piece is drawn as follows:
- All long lines are 10 cm, and all short lines are 5 cm.
- If you want to make a whole cake out of pieces, then at this size you will need to assemble 13 individual elements.
- If the short lines on your blank are more than 5 cm, then, accordingly, the pieces themselves will be large and for the whole cake you will need to make them smaller.
Decorating crafts
Once you've cut your cardboard cake piece to size, apply glue to the strips indicated by the dotted line. Pre-make all the folds of the paper. If you are planning to insert a surprise into the cavity of the box, for example, a toy or sweets for a child, then do not glue the side, but simply cover the inlet.

Tiered cake
The photo below shows how a cake is made step by step from three tiers of different diameters. Their sizes are chosen by eye, each next tier is made a couple of centimeters narrower than the previous one. Two identical circles are taken as the basis of each layer of the cake.

Connect them together with strips of paper equal to the circumference plus 1 cm for gluing on the side. To attach the sides to the circles, leave an extra 2 cm of paper on each long side. Then cut off the corners around the edge with scissors. It is they who are smeared with glue and strengthened on the back of each circle.
Tier connection
After all the layers are made, they are placed on top of each other and attached with PVA. Set the bottom, largest cake on a solid base so that it is convenient to carry the craft from place to place.

All tiers are decorated in the same way, placing flowers or leaves on the visible parts of the lower and middle tiers, as well as completing the top layer completely.
Volume application
A multi-tiered cake can be made in the form of a voluminous application. The photo below clearly shows that each tier is made of wide strips of paper. Their edges are bent along the edges inward, and glue is applied to these strips. The decoration on the top of the cake is made from several hearts. They are first cut out of double-sided paper, and then folded in half before assembly.

Small decorative elements are glued to the outer parts of the cake tiers. You can cut out hearts, flowers or any other figures. Glue birthday candles if desired.
Now you know how to make a cake out of cardboard with your own hands. Try it, you will surely succeed.
-
 April 17, 2015Semolina bottle decor
 -
 April 17, 2015Very tasty and quick fried zucchini in a pan
 -
 April 17, 2015Desserts in cups How to make a chocolate cup
 -
 April 17, 2015Fried onion rings for beer in batter and simply in flour


