How to bake a loaf at home. Homemade loaf sliced by oven in the oven
Pour warm water into a deep bowl in which we will knead the dough. Add sugar and yeast. Mix well. Leave for 15 minutes until a lush foam appears.
Then add vegetable oil and mix everything.
 Sprinkle salt and add flour in parts. We add the flour gradually, first about a glass in three steps, stirring everything with a spoon each time.
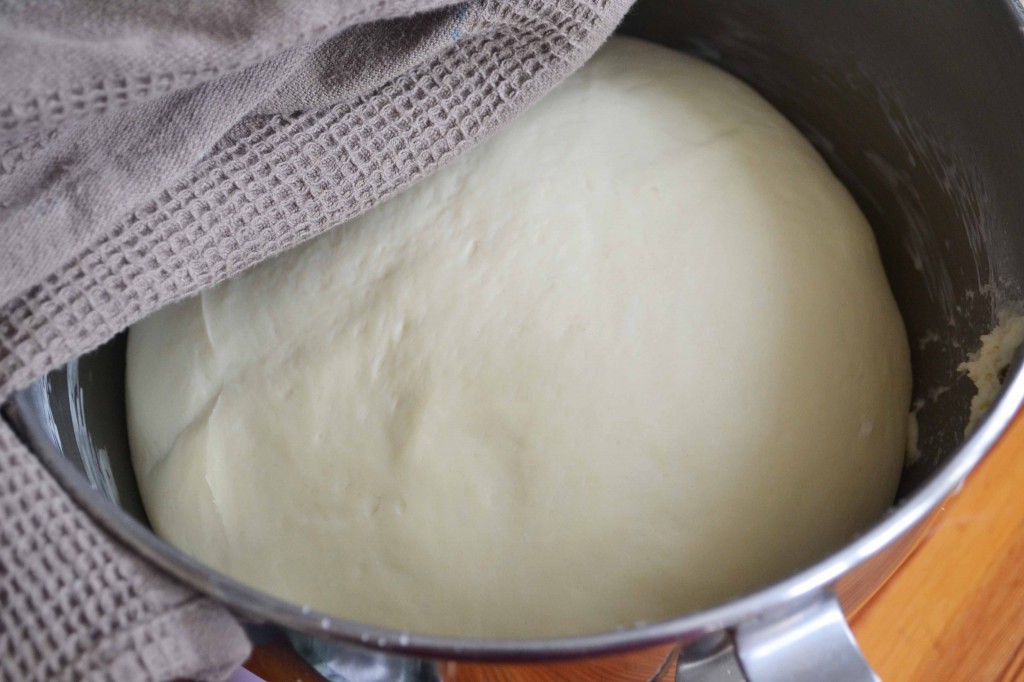
 Then we introduce the rest of the flour in the same way, kneading the dough with our hands. Ready dough It should stick a little to your hands, so it will rise better. Sprinkle it with flour on top so that it does not dry out and cover with a clean towel.
 We remove the bowl with the dough in a warm place for about 40-50 minutes. During this time, the dough should increase well in size.
 Sprinkle the table with flour and lay out all the risen dough. We roll it out in the shape of a rectangle, about 5 ml thick and roll it up.
 We pinch all edges well.
 Lay the roll seam-side down on a baking sheet lined with parchment paper, lightly dusted with flour. On both sides, the roll must be squeezed to the center with your hands, according to the accordion principle.
 Make cuts on top with a knife.
 Bake the loaf in a well-heated oven at 230 * C for about 10 minutes, then reduce the fire to 200 * C and bake for about 15 minutes or a little longer. The baking time depends on the type of oven and the degree of browning desired. We cover the hot loaf with a towel and leave to cool completely.
 To be honest, we did not wait long, I really like the crispy crust and hot crumb. The loaf is fluffy and delicious!

After complete cooling, the cut of the loaf looks more uniform, with a dense structure. After cooling, the loaf is perfectly cut even into thin pieces, for example, for making delicious homemade sandwiches. Photo cut the next day.
Immediately I apologize for the photo from the phone, I didn’t check the camera and kneaded the dough. I thought tomorrow I’ll take a picture of at least an already baked loaf, but my youth came from the “gulls” and pounced on the loaves)))
Dissolve the yeast in warm water, add everything else in turn. What glass was used to measure water - so measure flour, it is indicated not in grams, but in the volume of a glass. Be sure to sift the flour.
Knead the dough. Knead for at least 5 minutes. It will be quite a bit tight, but pliable and elastic and will not stick to your hands at all. You will immediately fall in love with him.
Divide into three parts and form sausages, about 5 cm in diameter.
My baking sheet is 25x35 cm.

Put them on a baking sheet greased with margarine, make oblique cuts with a sharp knife and put in a proofer in a warm place for 30-40 minutes.
I stood for 40 minutes just on the table in the kitchen and came up.

They fit well, so you don’t need to put arcs close to each other. I didn't grease the top. We put in an oven preheated to 180 * C, bake until well golden brown 30 minutes.

Try baking, you won't regret it.

It bakes perfectly.


Bran can be added to the dough, spices, dill, garlic, grated cheese - whatever your imagination tells you. But first try these, and then with additives to get the hang of it.
This recipe is part of the "Cooking Together - Cooking Week" campaign. Discussion cooking on the forum -
They leave much to be desired: the lion's share of it is crammed with baking powder and artificial flavor enhancers so much that the familiar loaves, loaves and loaves familiar to everyone since childhood have long lost their palatability. The article suggests taking a trip to the past and cooking a simple sliced \u200b\u200bloaf in the oven. Recipes with photos will help inexperienced young hostesses cook their own detailed instructions giving pleasure not only from the result, but also from the process itself.
Main characteristics of the product
Those who remember the "Soviet" version of the white loaf, with which they often drank tea, smearing it butter or jam, note the fine porosity of the crumb, in contrast to the modern, spongy, with large voids caused by large gas bubbles. If you follow classic recipe sliced loaf according to GOST, then the finished product must have:
Below are two recipes for a sliced \u200b\u200blong loaf in the oven: steamed (classic) and steamless (fast). Both of them are considered correct based on state standards, so we boldly take up cooking, having previously purchased high-quality products.
Necessary products for the recipe according to GOST
Sliced loaf in classic version has a fairly simple composition, but correct ratio ingredients and skillful preparation of the dough creates a rather tasty bakery product. In order to cook three loaves weighing four hundred grams, you will need:
- 450-500 ml of water. The amount of liquid depends on the quality of the flour.
- 750 grams of flour. Only flour of the highest grade is used, if you want to get exactly a sliced loaf according to GOST.
- The recipe from 1940 indicates pressed yeast - 15 grams, but if it is not possible to purchase it, then you can replace it with dry (fast-acting) in the amount of 6-8 grams.
- 12 grams of salt.
- Two st. spoons (without slides) of sugar.
- 27-30 grams of quality margarine.
Cooking dough
One of the main secrets of this product is the preparation of dough according to the recipe on the dough. Sliced loaf is obtained with a light crumb, but without excessive splendor, as is the case with modern bread on baking powder and additives. The first step is to heat 350 grams of water to a temperature of 50 degrees, dissolve the yeast in it, rubbing it well with a spoon, and add 375 grams of flour, mixing the mass thoroughly so that there are no knocked down lumps.
Next, cover the bowl with dough with polyethylene (it should have at least 3/4 of the empty space in it) and leave it warm: ideally it is 30-32 degrees. The average yeast activation time for the ripeness of the dough is three hours (sometimes a little more if the room temperature is below normal). If it has increased in volume at least four times - it's time to start kneading.
Second phase: knead the dough
Heat the remaining water well and dissolve sugar and salt in it. Next, following the recipe for a sliced loaf according to GOST, combine this mixture with dough, add the sifted flour (all that is left) and knead soft dough. In the process, add slightly melted margarine, which will give the dough the necessary plasticity, it will completely stop sticking to your hands and the table. It is important to thoroughly knead the lump yeast dough which from long attention becomes better and better. Next take some refined vegetable oil, grease the walls of the bowl with it, in which further fermentation of the dough will take place, form a lump and, placing it in a bowl, twist it slightly in it so that the dough is smeared on all sides with a thin film of oil - this little trick will not allow the dough to wind up if dishes will be accidentally opened.

Cover the top with a towel or clean cloth, return the bowl to a warm place and wait another hour or an hour and a half (this also depends on the temperature of the room). Important: after 30-40 minutes, after the start of the second stage of fermentation, knead the dough with your hands.
How to mold a loaf correctly?
When the dough reaches the condition, the next stage of the step-by-step recipe for a sliced \u200b\u200bloaf (in the oven) begins: molding the product. To do this, move the dough to a lightly oiled table and divide into three equal pieces. Further, in order to give them the ideal shape and structure of the loaf crumb, carefully (so as not to damage the gluten bonds in the dough) go through each piece with a rolling pin, squeezing big bubbles air and forming a relatively even rectangle.

Next, from the narrow edges, slightly bend the dough inward, and from the wide edges, fold them in half, forming a blunt-nosed oval. Line a baking sheet with parchment paper, lightly sprinkle with flour and carefully place the formed products on it, seam down. Melt for 50 minutes.
Bakery products
Immediately before baking, make four or five cuts on each piece of dough with a sharp knife, holding it at an angle of 45-60 degrees relative to the product. In the recipe for a sliced loaf according to GOST, four diagonal cuts are indicated, but you can experiment and make two or three horizontal, or eight small transverse ones, which will visually divide the bun into portioned pieces. The oven must be preheated well in advance at a temperature of 230 degrees.

Drizzle liberally over each loaf. cold water, place the baking sheet in the oven and immediately reduce the temperature to two hundred. After 12 minutes, you need to open the door, turn the baking sheet over with the front side to the back wall oven, brush the loaves with a beaten egg or milk for gloss and continue baking for the same amount of time. Cool finished products on a wire rack.
Preparing the dough using the steamless method
Considering that the standard recipe for a sliced loaf according to GOST (in the oven) implies a sponge method of preparing dough, many refuse it, because they know that this is a lengthy process, and it does not always work out due to the inexperience of the cook. Naturally, sourdough bread will always taste better, but if time is limited, you can use a simple, no-dough method. To do this, follow these step-by-step actions:

A few little secrets from the masters bakery production will help make pastries more tasty and attractive in appearance:

This workshop is for those who are looking for perfect recipe loaf at home. The easiest way is to make the dough in a bread machine and then bake it in the oven. This baking option is similar to a French baguette - very airy and porous, has a thin crust. It is prepared without baking, and therefore the product is very light. We offer to cook a sliced \u200b\u200bloaf at home using our recipe with step-by-step photos.
Such a loaf is ideal for making sandwiches, toast, toast and canapés - hence its name. In addition, such bread perfectly tolerates freezing: place the baked loaf in the freezer compartment, and defrost in microwave oven- the bread will be like freshly baked! The main condition for preparing a delicious sandwich loaf is to let the dough stand and rise properly.
A bread maker will help to knead a soft, elastic dough. In that step by step recipe the Binatone model (BM-2068) was used, which has the function of manually setting the work program. If you don't have one, use your oven's "Dough" setting or knead it by hand.
Cooking time: 2.5-3 hours taking into account the time to rise the dough
Ingredients for a sliced loaf at home (the output is 900-1000 grams of dough and 3 loaves):
- 1 full glass of water
- 1.5 teaspoons of salt
- 1.5 st. spoons of sugar
- 2 teaspoons instant dry yeast
- 4 tbsp. spoons vegetable oil
- 3.5-4 cups of flour.
Baton recipe
1) Pour water and vegetable oil into the bowl of the bread machine.

2) Pour dry ingredients into water with oil: sugar, salt, yeast.

3) Then add the flour, after sifting it.

4) Set the following parameters in the manual setting mode: first batch - 10 minutes, rest - 30 minutes, second batch - 10 minutes, rise - 40-50 minutes.
5) Keep track of what kind of dough is obtained during the kneading process. It should be tight enough.

6) After the program has finished, the dough should at least double in size and become very elastic.

7) Turn the dough out onto a floured work surface.

8) Divide it into three parts. Roll each part into a long cake.

9) Roll this cake into a roll. Do the same with the other parts of the test.

10) Place the loaves on a baking sheet lined with paper and sprinkled with flour.

11) Cover the loaves so they don't dry out and let them double in size.

12) After that, grease the top of the loaves and make oblique cuts with a blade or a sharp knife.


13) Bake the loaves at a temperature of 200 degrees in convection mode for about 25 minutes until golden brown.
They say Bread is the head of everything! It is not surprising, because the bread is nutritious, rich, tasty and perfectly complements the first courses. But today, more and more often, we are faced with the fact that store-bought bread is not of such excellent quality and very often spoils after 2 days, forming mold on the crust. This may indicate non-compliance with sanitary standards in its manufacture. Is it a matter of household delicious bread, which, when baked, emits such aromas that after you get it you want to immediately eat it all. We offer simple and quick recipe cooking with photo loaf bread at home in the oven. Believe me, having cooked it once, you will want to cook it again and again. So, let's first find out what we need to prepare it.
Ingredients for oven bread
Step by step cooking loaf bread in the oven

After the bread is ready, do not rush to cut it and eat it. Although the desire will be strong, let the bread cool a little. Hot bread is not very good for the stomach. After it has cooled, you can safely cut it and eat. Bon Appetit!
-
 April 17, 2015Canned garlic that does not require sterilization
 -
 April 17, 2015Confectionery quality and proper storage
 -
 April 17, 2015Mogul cough - all known recipes
 -
 April 17, 2015How to cook mogul for cough


